#201. I Turned Trash into Dining Room Chairs (& it was easy!)
The beyonce and I have been scoping out dining room chairs for over six months. Crate and Barel, West Elm, IKEA, Target and many a garage sale. Too expensive, too uncomfortable, too boring.
Then, while we were checking out our friend Gustavo's new house, we unearthed the solution to our problem:

One man's trash is another man's new dining room throne!
The former owners left two of these country-kitchen-chic chairs behind. What fools! Potential, for as far as the eye could see.
Now how do I go about tapping into said potential?
It's not that I'm anti-DIY, it's just that sometimes I look at the time and cost it will take me to do something myself... then compare it to how much it will cost to just buy the same thing. Often times, the project isn't worth the trouble. I'd like to change this about myself, as it seems really wasteful and just makes me sound like a brat. I am working on it. Hence, Josh and I decided make these (very comfortable, but very ugly) chairs work.
I took the lead on Project DIY Dining Rooms Chairs, which made no sense because I had no idea what I was doing. But they were free chairs, so what's the worst that could happen? We turn them into a bonfire or something! I'm sure those fumes would be very healthy.
The beyonce helped me create a plan:
First, we sand.

Nothing but the highest quality stuff for us!

The dog was very helpful here.
Apparently, you are supposed to sand WITH the grain. I didn't exactly know this, but was set straight pretty quickly. It's also very important to wear crappy clothes while making your chairs pretty. It's probably more important to wear a mask, but I guess I wasn't thinking about that in the moment.
Unrelated, a four-legged friend is great for company (but not that great at helping, as it turned out.)

Quit sanding, start petting.
Next, we prime.
We decided to paint ye olde chairs slate because, hey, we're kind of city-livin' hipsters. We love slate! At least they aren't neon. After sanding and wiping down the chairs, I applied a primer. The beyonce was pulling out his hair watching how s-l-o-w-l-y I applied this stuff. Sorry, dude. I guess that's how I roll.

dip dip dip, dab dab dab, brush brush brush

Isn't our grass glorious?!

Primed and ready for action.
Here comes the last step...Are you on the edge of your seat? I'll bet you have no idea what's coming next.
Okay, I'll tell you:
Now, we paint.
We applied two coats of a semi-glossy slate paint to both chairs. Yes, it was as simple as that.
Our final product:

Ready for Thanksgiving!
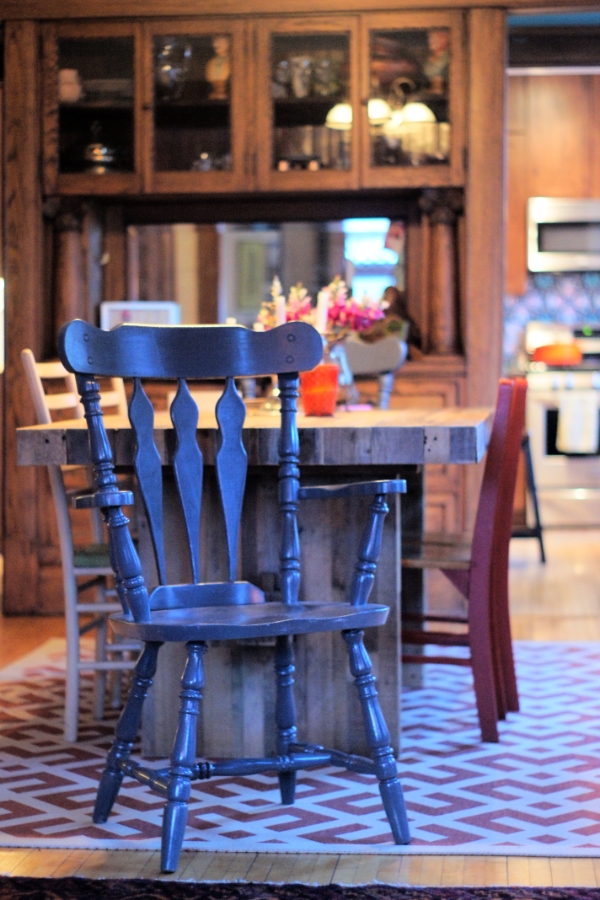
This looks purple, but trust me... it's slate.
They aren't perfect, but they are pretty darn great. The whole project (which spanned three days) only took about 90 minutes active duty and less than $30 in supplies. Very easy!
As you can see, we've got that whole mismatched chair thing going on, which I love because it means I can find chairs in my friend's garage and make it work. Jazzing up this chair myself definitely gave me a major boost, just in general. See? I'm not worthless when it comes to DIY, I'm usually just lazy and scared I'll screw it up.
Maybe I'll tackle something a little more complicated next time. I do have a winged back chair I've been meaning to pay someone to reupholster... I'll bet I can find a YouTube tutorial.